Saturday, September 29, 2012

Photoshop Cave Painting

Today I finished my first digital art assignment at Full Sail University. For my Art History class, I was assigned to make a "prehistoric"-style cave painting in Photoshop.


This activity taught me a few things about Photoshop. I'll briefly show you how I made the rock wall, added texture, and created a light source.

1. Rock Wall

First, open a new document in Photoshop.


Then, set your foreground and background colors to a light and dark color for your rock wall.


Go to Filter, Render, and select Clouds.


To add a touch of realism, add some noise.


2. Add Texture

Switch over to channels.


Create a new channel. It will be called "Alpha 1". 


Go to Filter, Render, and select Difference Clouds. Then, continue to select Difference Clouds until you get a pattern you like.


This texture will be applied to the rock wall in a second; but first, we need to add a light.

3. Light source

Switch back over to layers. Then, go to Filter, Render, and select Lighting Effects.


This cool lighting tool will then come up. You can adjust the size of this light, its intensity, its shape, its color, and more, until you get it to the effect you want. 


Then, before you hit "okay" on the light, go to the properties panel, click on "Textures", and select "Alpha 1."


You will then have a very rocky-looking texture from your Alpha 1 channel. You can adjust the height to make it very subtle, or very rough. Play around with it and see what you can make!


Moving to Full Sail


It's been a while since I've written, but much has happened. My passion for digital art has advanced from a mere hobby to a serious degree major. This November, I am moving to Winter Park, Florida, to study Digital Arts & Design at Full Sail University. I have already started online course work in advance, and I am stoked the skills I will learn in graphic design, web design, motion graphics, animation, 3D arts, and more.

What does this mean for you? Well, firstly, lots more information I can share on this blog! Secondly, however, I will be very busy with Full Sail's incredibly fast-paced, accelerated program, and I'm not sure how much time I will have for blogging. But I will try to post on here as much as I can, and share some of what I learn so you can walk this journey with me. I hope to see you along the way!

Me visiting the Full Sail campus in June, 2012

Wednesday, July 4, 2012

Photography Tutorial: Shutter Speed & Motion

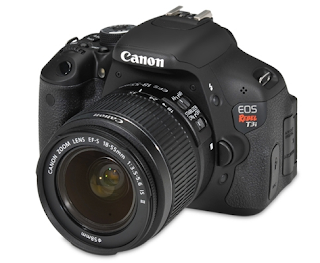
Canon EOS Rebel T3i digital SLR camera. Picture from retx.net.


I recently made the exciting purchase of a Canon EOS Rebel T3i digital SLR camera!  As I learn to master it, I'll share with you the lessons I learn, just as I share with you my lessons in digital art.

This first photography tutorial is on the concept of shutter speed.

Part 1: What is shutter speed?

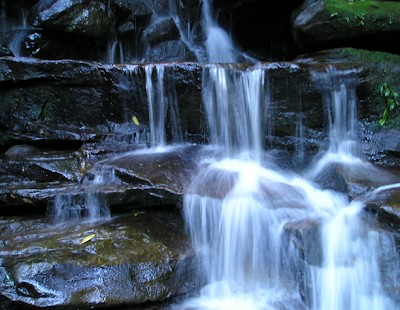
Have you ever seen a photo of a fountain or waterfall, where the water was smooth and blurred?  Or a photo of a city scene where the cars seemed to streak by in a blur of motion?  (See examples below.)

Smooth, blurred waterfall
From Waterfall by ~xPhate on deviantART

Blur motion
From digital-photography-school.com

Blur motion
From smashingmagazine.com

Or, on the flip side, have you ever seen a photo where a moving subject is frozen mid-action, and water may appear as individual droplets, rather than a smooth blur?  (See examples below.)

Frozen action shot
From boston.com

Frozen action shot
From cruzine.com

Well, those pictures don't just happen!  They involve a photographer intentionally changing settings on his or her camera to make the image either blurred, or frozen in time.  The settings that will effect this are called the shutter speed.

Shutter speed is the speed at which photo is taken.  For example, a shutter speed of 1/30 means that the photograph was snapped in one-thirtieth of a second.  The faster the shutter speed, the clearer and more "frozen" the image will appear; the slower the shutter speed, the smoother and more blurred the image will appear. 

Shutter speed chart 
From miketurner-photography.co.uk


Think about it this way: If a photograph is taken at a fast shutter speed (1/100, for example), then the image is being recorded for one-one-hundredth of a second; it is only recording what happened in that extremely brief fraction of a second.  It makes sense that that would yield a crisp, frozen photograph.  

Alternatively, if a photograph is taken at a slow shutter speed (2 seconds, for example), then the image is being recorded for that much time; it captures all the movement that takes place in that period.  The result is a blur. 

The differences between fast and slow shutter speeds

From exposureguide.com

From digicamhelp.com

Part 2: How to change shutter speed

The way to change shutter speed on a Canon DSLR is by turning the Mode Dial to "TV" mode.


You can then change the shutter speed by turning the Main Dial, right behind the shutter button.  The changing shutter speed will display on the LCD monitor.


Part 3: Applying what we learned

You may be wondering: How fast or how slow should the shutter speed be?  The answer is... it depends!  While the chart above from Mike Turner Photography is definitely helpful, I will still say that the selection of shutter speed completely depends on what the photographer wants (do you want it to be frozen or blurred?), and on the setting and situation.  Experiment and see what you discover!

To illustrate the concepts of this tutorial further, here are some photos I took while experimenting with shutter speed for the first time. 

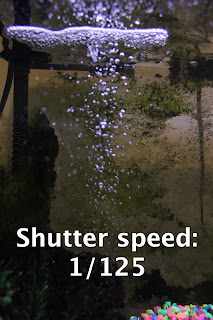
Fish tank bubbles


Notice how, as the shutter speed gets faster, the images get darker.  This is because the shutter inside the camera is opening and closing faster, which allows less light to enter the camera.  I believe the darkening effect of faster shutter speeds is counterbalanced by adjusting ISO, but that's a skill I still haven't learned, and it would be a topic for another tutorial!

Fireworks

I took these photos this Independence Day!  This first photo was taken with a really fast shutter speed (somewhere in the league of 1/200; I don't remember the exact number), causing the firework fountain's sparks to appear as individual particles, like bits of snow or dust.  Note also the light-sabers in the back that my brothers were swinging around, but do not look blurred.


Next I took pictures with a really slow shutter speed (again, I don't remember the exact number, but it must have been somewhere between 1/10 and 1"), and I had these fun, fountain looks.


Note how blurred the light-sabers are now!


Returning to a normal shutter speed (somewhere between 1/30 and 1/80) rendered an image that looks more like what we see with our eyes when watching a firework.


Conclusion

There are a lot of things you can do with shutter speed... go have fun with it!  Then, come back here for more photography tutorials, coming soon... and leave a comment about what you've been able to do with shutter speed.

Play safe and have a Happy Independence Day!

Sunday, May 20, 2012

Blender modeling tutorial

Today we have a guest tutorial author!  My younger brother, who has recently joined me on the journey of teaching ourselves Blender (a free, open-source 3D modeling software), created an excellent, thorough tutorial of how he created a simple, yet highly maneuverable human model.  This model can be easily animated or posed.  Because the tutorial is composed entirely of pictures, with step-by-step instructions on each image, the entire tutorial is rather long for a traditional blog post.  Instead, we assembled it on a separate page, which can be accessed by the tab at the top of this blog, or by clicking the link below:


Sunday, March 18, 2012

Explosions in Bryce

Image from brycetech.daz3d.com

Check out this cool tutorial I found about using the randomize tool to create explosions in Bryce!

Click here to see the tutorial.

(If for some reason the link no longer works someday because this post is old, I found the tutorial at brycetech.daz3d.com.)

Sunday, March 11, 2012

True beauty and the ethics of Photoshop

I find it fascinating how fake the models are that we see in magazines and ads.  Most models look like ordinary people before the makeup, lighting, and particularly the Photoshop adjustments, transform them into these artificial and flawless... what shall we call them?  Gods and goddesses?  Angels?  Aliens?  Whatever they are, they are not natural and they are not real.  Here are a few examples I pulled from www.hemmy.net:

(The original image is first; the Photoshop image is shown after.)


Is it just me, or do these pictures make you feel sick?  In each of these cases, I think the original model is physically attractive.  None of these photo edits make sense to me, with the exception of the blemish that was removed in the second picture (with a blemish that obvious, I think I'd remove it, too!).

And yet, it is these edited, counterfeit pictures of models that so many people -- girls and women in particular -- subconsciously look up to as standards for attractiveness and beauty.  According to a study in 2004, only 2% of women think they are beautiful (www.dove.co.uk).  This is a shockingly low number, but should it really be surprising, with the repulsive way beauty has been contorted by our media?

"I wish I looked like such-and-such an actress!" a woman may moan.  But I would plead in response:  "Please understand that you probably do!!"

If you haven't seen Dove's video "Evolution", you need to.  This is another excellent glimpse into the phony world of modeling:


Now, don't misunderstand me: I am not necessarily opposed to editing photos.  I've done it myself on a small scale.  I understand; sometimes the lighting of our photos isn't good.  Sometimes models wake up on photo day with big zits on their foreheads (GACK!!).  That isn't what I'm talking about.

What I am talking about is morphing someone into an unnatural, impossible non-human that no person could ever physically rival in real life.  I'm talking about making aliens into our standard for beauty.  I mean, you might as well make this our standard for beauty (I am talking about the left half of the picture, of course):

By the way, I have no idea what this book is about, I'm not endorsing it, and I couldn't tell you if it was extremely inappropriate or terribly written. I'm just borrowing the cover to emphasize my point... 
As computer artists, we have these questions to ask ourselves:  What is most important or valuable, as we make our computer art, or edit our photos?  What is our highest priority in this matter?  What should be our highest priority?  What power do we wield, as computer artists and culture influencers, and what are we personally doing with that power?  Let me be more specific:  Are we doing more harm or more good with that power?  And if we are doing more harm... what should we do differently so we are doing more good?

What do you think?