Saturday, December 24, 2011

What is a green screen?

Today's video tutorial explains what a green screen is, how it works, and how you can buy one yourself.  This video is based on a speech I delivered in a contest on December 8.

Coming soon: Part 2, "How to use a green screen with iMovie"


Read the entire script below:


Have you ever wanted to be a flying superhero in the sky? Or maybe this: a fantastical creature with wings or faun legs, like a character from the Narnia movies? Well, with a green screen, you can! Green screens are what allows movies to put their actors in alien locations or with fantasy creatures. 

Now, you certainly won't be able to create the life-like realism of Hollywood movies, but anyone can create a decent green screen effect at their own home, with a few easy steps and some cheap equipment. As someone interested in filmmaking, I'll show you some of the things I've learned over the years, and picked up through research.

In this video, we'll learn a little bit more about how green screens work, and how to buy one for your personal use. Then, in the next video, we'll learn how to set up a green screen, and how to apply iMovie's easy green screen effect. All right, let's get started!

So, how do green screens work? Let's look at a few examples from movies.


You may have seen the Narnia movies, and the centaur creatures that appear in them. Centaurs look like half-human, half-horses, with the head and torso of a human, and the body of a horse. Now, despite how life-like the centaurs appear in the Narnia films, I can guarantee you that the filmmakers did not go out into the woods, find a few centaurs, and hire them to act in their movies! So, how did they make the real actors look like they had horse rear-ends? Well, they used green screens. The actors actually wore green pants, which could later be replaced with the computer-generated horse bodies.


Here's another example of green screens being used in movies. You may have seen the Star Wars movies. There are many, many occasions when green screens were used in Star Wars. One of my favorite examples is Anakin's emotional scene in Episode III, when he stands in front of a window, looking out as the sun sets over a science fiction city, and a tear rolls down his face. Now, I guarantee you that when they were filming this, the actor, Hayden Christensen, was not looking out a real window, seeing this city scene! The amazing thing is that Christensen was probably looking at nothing more than a green screen, and yet he still delivered such a powerful performance.


So, how exactly do green screens work? It's a simple act of replacement. The filmmakers film a scene with the green screen; then, later on the computer, they replace that green screen with something else, like a star field, or a horse's rear end. 

It's just like this puzzle. All you have to do is remove the green and replace it with something else. It's that simple.

According to visual effects filmmaker Zach Lipovsky, "Greenscreening is just basically telling the camera to replace anything it sees as green with whatever you want." Of course, this involves a lot of imagination for the actors, as in the case of Hayden Christensen in Star Wars, but it results in a really cool effect. And you can do this, too!

Now that we've looked at what green screens are and how they work, let's look at
how to buy a green screen, so you can use one yourself.

Where should you buy a green screen? I've found that the best place to get a good deal on a green screen is online, on Amazon or eBay.

What should you look for? You want to make sure that the green screen is low in cost, but is also large enough that your actors can move around. When filming with a green screen, the green color has to fill the entire frame (that is, everything you can see on camera) at all times; and if the green screen is small, that doesn't give your actors a lot of room to move around. So, look for economy, and for a large size.

In this video, we've looked at how green screens work, and how to buy one for your own personal use. In the next video, we'll find out how to set up a green screen correctly, and how to use iMovie's easy green screen effect.


Sources used for research:

Guye, Phil.  "Green Screen Technology - A Factor in Many Films Today."  Ezinearticles.com.  16 October 2009.  Web.  14 November 2011.

Hanke, Jeremy, and Michele Yamazaki.  Greenscreen Made Easy: Keying and Compositing Techniques for Indie Filmmakers.  Studio City:  Michael Wiese Productions, 2009.  Print.  (Excerpt found at Books.google.com.)

Narniaweb.com.  Image gallery.  Web.  14 November 2011.

Supershadow.com.  Star Wars Images.  Web.  14 November 2011. 


Thursday, December 15, 2011

How to make a 3D snowflake on Bryce


I made this image a while ago on Bryce, one of my favorite 3D modeling softwares. Bryce specializes in landscape design, but is capable of so much more.

Today, I'll show you how I made this image, with two things: (1) Windows Paint, and (2) a symmetrical lattice (a concept in Bryce).

A side note: I definitely could have used Photoshop instead of Paint. In fact, the process would have been easier, and the results cleaner, if I used Photoshop. However, at the time, I didn't have Photoshop. Besides, this goes to show that you can create a pretty cool effect in Bryce, even with a supporting software as rudimentary as Paint.

Another side note: The technique in this tutorial can be used to create all kinds of hand-drawn 3D objects, not just snowflakes. Try it out yourself and see what you can come up with!

Now, without further ado, how to make a 3D snowflake...

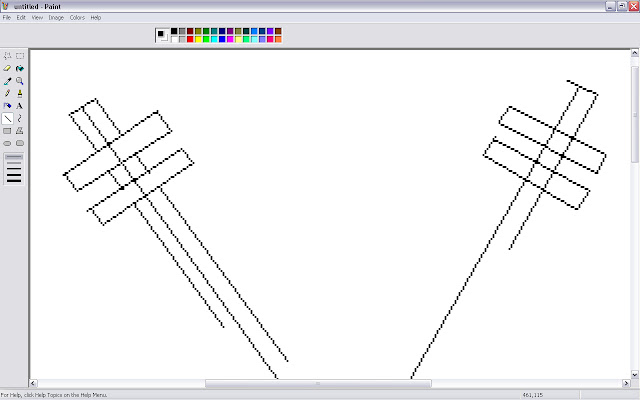
Step 1. Open Paint and create a simple snowflake shape, using straight lines.


(A closer view)


Step 2. Erase all the inside lines.


Step 3. Use the "Paint bucket" tool to fill in the background with black.

As you can see, it's not a very clean result, so you may need to paint out those remaining white areas by hand. Just zoom in, select the "Paint" tool, and keep painting around the edges, until everything outside of the snowflake is black. Note: This may be optional, as the snowflake can be further edited in Bryce, but it will at least make things easier later.


Step 4 (optional). If you want, you can prepare the snowflake a little for 3D. A quick concept to understand: When turning a flat image into a 3D one, the darkness or lightness of the image represents distance. Darker colors represent something further away, and lighter colors represent something closer.

For an example, if you were painting a mountain, the base would be black, the slopes would be gray -- getting lighter the closer you get to the top -- and the peak would be white. This is why the background of this image is black.

For this snowflake, you can add a little 3D texture to the edges, by adding two shades of gray (with the darker gray on the outside, of course). But again, this is optional.


Here is the finished design in Paint: (crude though it be)


Step 5.
Open Bryce and create a "symmetrical lattice".

In Bryce 7, this can be found in the "Create" menu at the top of the screen, between the stone and metaball.


Step 6. Go to "Edit object", by clicking the "E" button next to the selected lattice. (The "E" button is part of a vertical string of buttons, including "A", "M", and "I", which show up when the object is selected. You'll know it's selected if it's red, like in the picture above. If it isn't selected, simply click on it.)

When you click "E", the editing window will show up.


Step 7. On the right, under "Editing tools", select "Pictures" (if it is not selected already).

You'll see three pictures. Click the "Load" button above one of them, and browse on your computer for the snowflake image you created in Paint; then, click "open".


Step 8. Above the other picture, click "Load", and select the snowflake image again. Click "open".

Then, under Editing Tools, click "Apply".

It should now look something like this:


Step 7. To save your changes and exit the editing window, click the checkmark in the bottom right corner of your screen.

Now your lattice will look something like this:


Step 8. Flatten the lattice by clicking on the black dot directly above it, and dragging your mouse to the left; or, by resizing it through the "Edit" menu (between "Create" and "Sky & Fog") at the top of the screen. (If you resize it through the "Edit" menu, you'll want to resize along the Y axis; again, dragging your mouse to the left.)


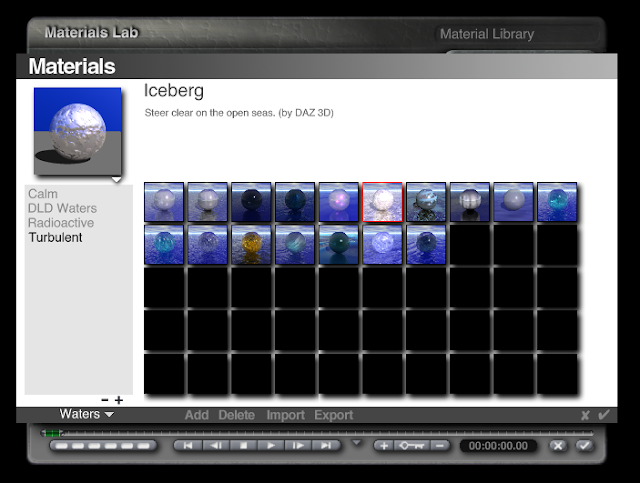
Step 9. Enter the Materials Lab by clicking the "M" button (just above the "E" button).


Step 10. Click the triangle, circled below in red, to enter the Materials Library.


Step 11. In the drop-down menu at the bottom, select "Waters".


Step 12. Under the category of "Turbulent", choose "Iceberg".


Step 13. Click the checkmarks to exit from the Materials Library and then the Materials Lab.

Render the image by clicking the big green button on the left of the screen.


The rendered image: Pretty cool! It looks like a crystal snowflake!


With some more tweaking, (e.g., moving the camera's perspective to look up at the sky, changing the sky to look wintery, making copies of the snowflake, moving some snowflakes further away, etc.), I got the finished artwork:


Changing URL

Just a note: I'm about to change the URL of this blog from "www.completelyfreevideotutorials.blogspot.com" to "www.completelyfreetutorials.blogspot.com", without the word "video".  Just to make a rather long URL name easier to remember.  I hope this doesn't cause any confusion!

Blender navigation solutions on a Mac

Apparently, in Blender, (a free 3D modeling/animating/gaming software that I'm beginning to learn), there are a lot of navigation functions that are crucial for using the software.  For an example, you need a three-button mouse, preferably with a scroll wheel, and you really should have a number pad.  What's a number pad?  A number pad consists of those number keys to the side of your keyboard - not the 1 through 0 number keys at the top of your keyboard.

A number pad
Well, I have a problem.  My computer is a notebook (AKA "laptop"), and it's a Mac.  My Mac does not come with a mouse, and it certainly does not come with a number pad.

So, can I still use Blender?  What should I do?

Today, I'll show you how I solved these problems, and how you can solve them too.

Before I do that, I want to mention a few things.  First, in my quest to solve my navigation problems, I discovered that we so happened to have an Apple "Magic Mouse" lying around the house.  Thinking my problems were solved, I gleefully set it up to work with my notebook -- only to discover that a "Magic Mouse" not have a middle button.  The first thing I'll show you today is how to give a "Magic Mouse" that middle button. 

Magic Mouse (Image from apple.com)

Second, I read online forums that said I could mimic a number pad by clicking the function key (fn) plus certain letter keys (such as J, K, L, U, I, etc.), but for whatever reason, this wasn't working on my computer.  For those of you who are experiencing the same problem, I'll show you the answer I found through intensive Googling... so now, if you have found this tutorial, you don't need to search any further!

The solution, to both problems, is actually quite simple: You just need to download two programs that will allow you to add a middle button and emulate the number pad.

Steps for adding a middle button


1. Download MagicPrefs


2. Open MagicPrefs Preferences


3. Select "One Finger Middle Axis Click."  (Note that there are a lot of other changes you can make with MagicPrefs... I didn't take the time to play around with it, but it looks like it has a lot of potential.)


Steps for emulating a number pad

1. Download KeyRemap4MacBook PrefPane


2. Open KeyRemap4MacBook preferences


3. Select "Change Num Key", as shown in the picture below.  (You can click on the image to make it bigger.)  If you're having a hard time finding the "Change Num Key" option, try searching "num", as I did in the picture below.  You may have to scroll down once or twice, but it should show up.


Well, that's it!  Pretty simple.  I hope this helps someone like it helped me!

Monday, December 12, 2011

The journey begins here


Hi there! I'm so glad you've stumbled onto this site, whether by a chance Google search, through a link on another site, via a recommendation from a friend, by personal acquaintance, or by other means. I'm excited to begin this journey with you -- this journey of learning, discovery, and obtaining new skills.

So, who am I? I am a blogger of almost three years, and an aspiring novelist and filmmaking. In recent years, I have also acquired a fascination with all kinds of computer art: from graphic design to 3D modeling, from web design to desktop publishing, from video editing to gaming, and everything in between.

As this interest in "artsy computer things" has quickly grown into a passion, I've been trying to learn more in these areas, develop my skills, and increase my knowledge of how to use the necessary software.

So, what is this blog? This is where I'll share with you the skills I learn along the way. As I traverse the adventurous road ahead of "learning how to make computer art", I'll do my best to share the knowledge I come across.

So, what do you say?

Will you journey with me?